Paul WB0GXD writes, “There were some near-catastrophe problems […] to overcome at the antenna party on Saturday November.” In this story you will learn from valuable experience as the volunteer crew refurbish an aging 75-meter horizontal loop antenna. Their work in a contribution not only to Paul’s antenna, but sharing their experience helps the rest of us build better antennas.
special thanks to SWIARC club member Paul WB0GXD for contributing the following story.
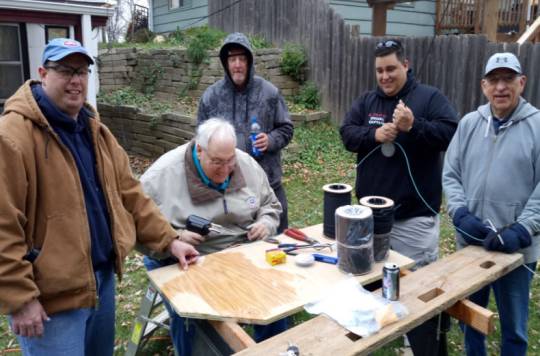
Some near-catastrophe problems had the crew at Paul WB0GXD’s scratching their collective head as they engineered ways to overcome the problems at the antenna party on Saturday November 4th. The party started at 9:00 AM and was originally scheduled to be done by noon, with a lunch for all of the volunteers that participated.
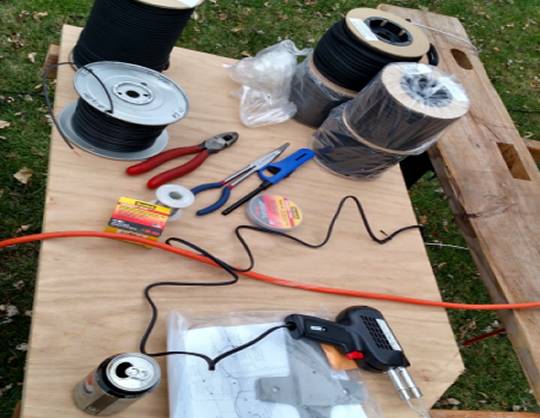
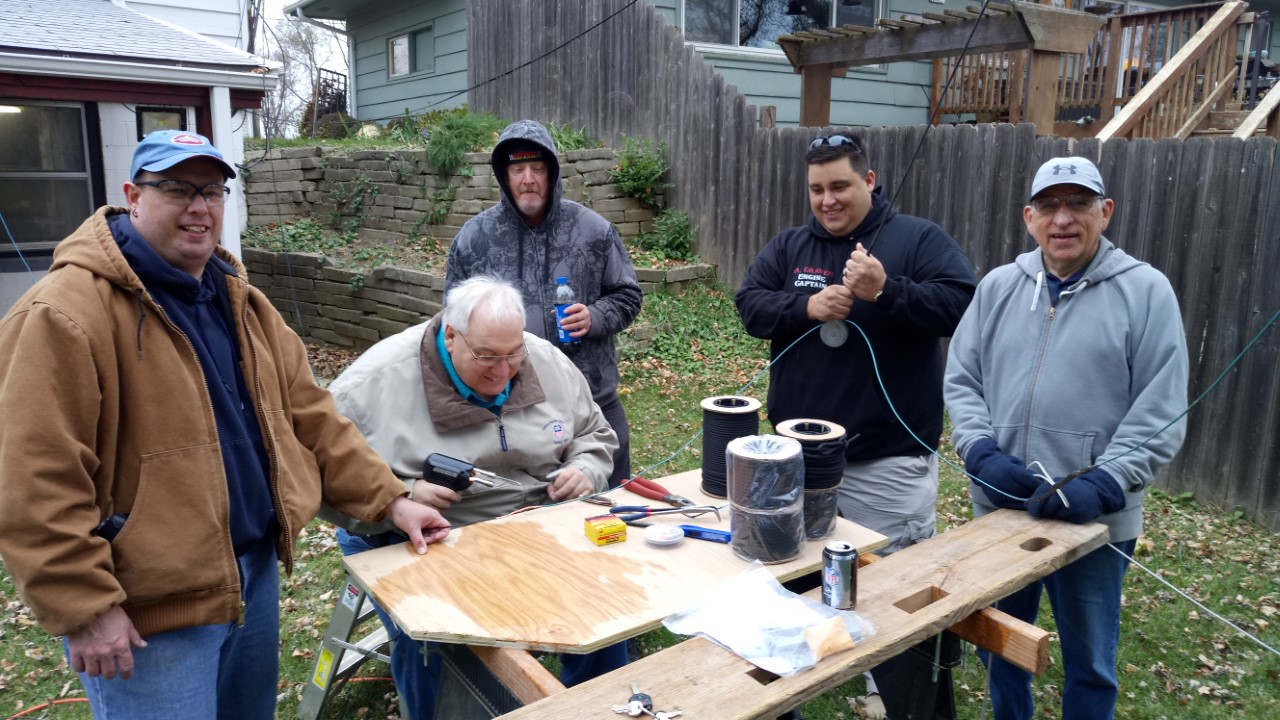
The workbench, complete with new 12 ga, insulated antenna wire, spools of both 5/16” and 3/16” DACRON rope, a new ladder line feed point support, and rubberized moisture sealing electrical tape.
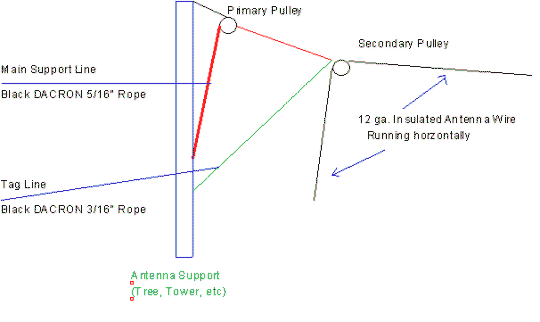
The antenna party’s goal was to refurbish an aging 75 meter horizontal loop antenna that was about 250 feet in length and was supported in the four corners of the property with pulleys. The pulley arrangement that had been installed when the antenna was originally installed over a decade ago involves two pulleys at each corner as shown in diagram 1.
By design, the secondary pulley can be lowered for maintenance by unfastening the main support line and pulling down the pulley using the tag line. Unfortunately, when the antenna was originally built the tag line used standard cotton rope instead of the DACRON rope specified. The original tag lines had all rotted away over the years and the pulleys were lowered by pulling on the old antenna wire. They were replaced with the 3/16” DACRON rope as shown in diagram 1 on the following page.
ANTENNA SUPPORT STRUCTURES AFTER REFURBISHING
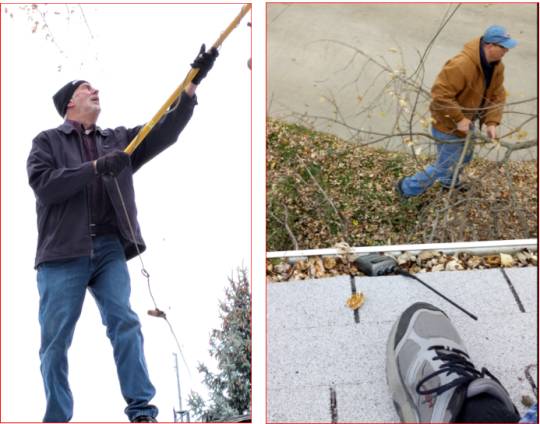
After the antenna wire had been lowered to the ground the tree trimming crew went to work, trimming the tree branches that had grown into the and around the antenna wire. While Rich ZQG was on the roof of the house trimming away, his handi-talkie got away from him and almost did a 8 ½ gainer to the ground. Fortunately, the rain gutter caught more than just leaves, rescuing the HT from an uncertain fate.
Rich is on the roof trimming tree branches, while his HT is falling to the roof, down and landing safely in the rain gutter.Fortunately for Rich, his HT was caught in the roof gutter rather than impacting on the ground below.
While the tree trimming crew was doing their thing, some of the team spliced the new antenna wire on to the old antenna wire in preparation of pulling it through all of the pulleys. This worked OK for the first two pulleys, but proved to be impractical for the last two. The old wire was then cut from the new wire, and the new wire threaded by hand through the last two pulleys. Then the new antenna wire was routed back to the first pulley to complete the loop.
Here’s the crew watching Paul splicing antenna wire on to the old before threading it through the pulleys.
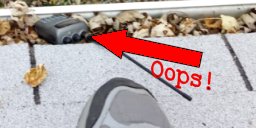
We began to hoist up the first of the pulleys (the one on the tower, where the feedpoint will be) with the new antenna wire. Immediately after the first pully went up it was discovered that the new tag line had not been attached. OOPS! We decided to use the antenna wire to retrieve the pulley and attach the tag line. Because the wire routes through the branches of the adjacent pine tree (we couldn’t reach them to trim them out) it was decided to use the next pulley, over the shed, in order to pull the first pulley down.
In the process of manipulating that second pulley, the end of the 5/16” rope that is used to hoist up that pulley got loose and immediately zipped up into the tree and was stopped at the pulley by the knot in the end of the rope. DOUBLE OOPS! Now we had a real dilemma on our hands. No easy way to get at the end of that rope at the pulley in order to pull it back down. Hmmm….
After a period of time of cussing and discussing the situation with various solutions (and some commentary about knot-tying skills ��), we figured out that by disconnecting the steel guy wire that holds the primary pulley in place, and tying a rope on to the end of the guy wire, we could lower the primary pulley and then retrieve the loose end of the rope on the secondary pulley, re-raise the primary pulley and re-secure the guy wire! Problem solved! This process took a while as the eyebolt that secured the guy wire had to be dug out of the tree because the tree had overgrown around the eyebolt.
After all of the crisis had been resolved, we fastened the ladder line to the new feedpoint support and the ends of the new antenna wire and hoisted the antenna in to the air to see how we did. Not too bad. The antenna was rubbing on the roof of the house, but not by much. We lowered the first pulley, removed about three feet of wire, and tried again. Looks good all the way around!
When we went in to the shack and tested the antenna, it loaded up on 75 and 20 meters just fine! We listened to a South African station working a pileup on 20 meters. He was sounding great. Later that evening I tried it out on 75 meters and had good reports from some of the guys that check in to the Iowa Traffic Net on 3970 KHz.
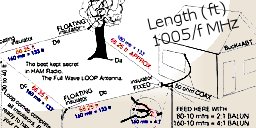
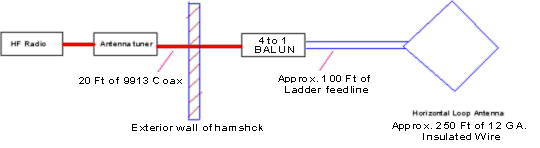
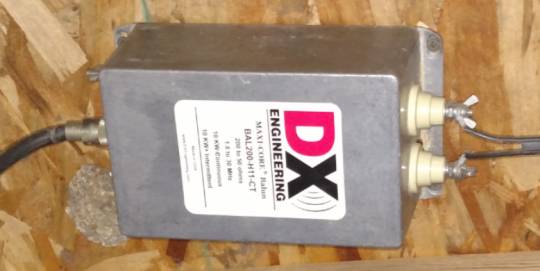
Block Diagram of the Horizontal Loop Antenna SystemThe 4 to 1 BALUN Mounted Under the Overhang Outside of the Hamshack. Impervious to Wasp Nests.
All in all, it was about 2:30 PM when we wrapped everything up and headed out to lunch at Lansky’s on North Broadway. About two and a half hours longer that was anticipated. Not bad, considering the obstacles!
I would like to extend a heart-felt thanks to the crew for all of their help and support with this project. It was a lot of fun working and playing with these guys on this project. I would never have been able to get this antenna refurbished without them:
Albert KE0LOL
Joel K0OQL
Mike KD0HZF
Rich WA0ZQG
Russ AD0QH
Terry KS0L
Thomas No Call, but studying!
Written by: Paul WBØGXD
Photo credits to Rich ZQG, Russ QH, and myself.
Original Story: GXD Antenna Party on November 6, 2017 by WAØZQG (below)
Paul WB0GXD solders wire with new 250W gun
SWIARC Pres Russ AD0QH showed up along with Mike KD0HZF, Albert KE0LOL, Terry KS0L, Rich WA0ZQG and others to help Paul renew his 80M loop. That’s Paul soldering the insulated and stranded black wire for the renewed antenna. Between hacking away a couple of tree limbs, and putting up each corner of the wire, the whole job lasted well past the estimated Noon time frame, but no one complained as it was an interesting event. Paul has coax out to a DX Engineering aluminum encased balun; then plastic insulated open wire line to the feed point, and about 250′ of wire 15 to 20 feet up in his back yard – from the house to tower, to tree, to another tree in the front yard, and back to the house. The weather was cool and cloudy. A great time was had by all.